SUBMIT A QUESTION
Have a question you’d like to have Todd answer? Submit it to Tech Tips with Todd and if he chooses to answer your question in his weekly article you’ll also receive a gift from RUPES!
Q: I’m working on a yacht and the owner has several plexiglass windows. He had another guy polish them to get the scuffs and scratches out and in doing this he burned the plastic bad in several spots. So he’s hired me to fix it. I’ve had to sand them and polish back I’ve used 400 grit and worked my way up to 5000. It’s getting better but now he’s not happy with all the pigtails. I’ve gone over the windows now at least three times the last time with 1500 up to 5000 to get the sanding marks out. They’re not coming out completely and am wondering what I could do differently or how to make them better.
Jerry from Surprise, AZ
Hi Jerry,
Thank you for taking the time to submit your question.
Removing sanding marks from any surface can be frustrating or difficult, and often is both. We have to identify what is causing the sand marks, and in what step of the process they were inflicted.
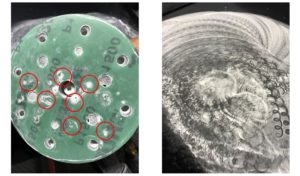
In your question, you referred to the sand marks as “pigtails”. For readers who may not be familiar, “pigtail/s/ing” is a term that refers to a scratch pattern which resembles a curly-q. Thes unique shape of these often difficult-to-remove marks is the result of the movement created by a dual-action random-orbital sander. While pigtails can be created by a number of problems, the most common cause is that some particulate or material will build up in between the sandpaper and the surface being sanded, creating a high point. This high point then gouges the surface, much like a rock would if stuck in a polishing pad. More aggressive sandpaper can be uneven by nature, plus the rate of material removal is higher, resulting in a greater chance to create isolated scratches which resemble the coiled tail of a pig.
The image below is an extreme example to highlight the cause of the issue. On the left, you can see circled areas where the sandpaper has become loaded with material, and on the right, the pattern those isolated clumps create on the surface. When the residue is wiped away you would see a deeper scratch that follows that exact pattern.

Sanding Plexiglas, because of the way the material fractures as it is abraded, can make this problem even worse. Let’s see if some technique adjustments might be a good start. While it might be impossible to avoid all pigtails on all surfaces, a few pointers will help.
Be aware that pigtails can penetrate quite deeply into the surface. This is particularly true if the pigtail scratch was created earlier in the sanding process with a coarser sandpaper. If this the case, it may require sanding with a coarser grit than that the paper which introduced the defect simply to address the pigtails.
If you’ve tried all the adjustments above and still find yourself combating pigtails then you may need to step back and try sanding by hand. Sanding by hand gives us the advantage of creating a scratch pattern in one direction – say east-to-west. We then do the next sanding step, with a finer paper, in a different direction – say north-to-south. Once all of the previous direction marks are removed we know we have progressed the surface to the next grit.
With a dual-action sander, the scratch pattern is dispersed making it much more difficult to visualize the progression of the surface so we must rely on a uniform change in sheen. As we progress the surface, the sheen will tend to increase. In the case of Lexan or Plexiglas, the surface will become more transparent. In your particular case, I would recommend taping a business card or a picture on the inside of the surface you are sanding. This will allow you to have a visual aid to judge clarity or improvement as you work through the various abrasive levels.
One additional, and often overlooked, part of multi-step sanding is the tendency to not spend enough time with each finer grit abrasives. You want to spend enough time in each stage to fully remove the previous grit sand scratches. A rule-of-thumb is to spend twice as long sanding with each finer step than you did with the previous. So for example, if you spend 60 seconds with 1500 grit, you should spend at least 120 seconds with 3000 grit. This, of course, is just a rough guide, but it drives home the point that all of the previous grit scratches have to be removed with the finer grit otherwise the deeper sand scratches will remain even after your buff out the finer scratches.
For me personally, I like to start my sanding with 6mm RH356 Skorpio III dual-action sander because the orbit size offers good control and precise material removal. However, as I progress the surface I prefer increasing the orbit length to 9mm with the RH359 Skorpio III dual-action sander. The additional orbit length helps the finer sandpapers remove the previous sanding marks, and the additional movement can help keep the sanding disc cleaner, resulting in a win-win.
I hope these answers help! Good luck in your project and thank you for taking the time to ask the question.
Yours in better gloss,
Todd Helme | Senior Technical Advisor, RUPES USA
Have a question you’d like to have Todd answer? Submit it to Tech Tips with Todd and if he chooses to answer your question in his weekly article you’ll also receive a gift from RUPES!

 What is the warranty for RUPES tools?
Connect With Us